WhatsAppy
Documentation
Getting Started
Upon installing the app on your Shopify store, you will be presented with the Settings page.
From this page you can add numbers / agents, edit existing numbers / agents, and set the opening message.
Creating a Number / Agent
On the Settings page, you will see a section dedicated 'WhatsApp Numbers / Agents'.
The title section of this area contains a blue button on the right called 'Create Number / Agent'.
Once clicked, it will add a new number / agent to the list for you.
This new number will be inactive by default and have no predefined GEO country.
From here you can click the settings cog icon at the end right of the row to edit. See below for editing the number / agent.
Editing a Number / Agent
At the end of each number / agent row sits a settings cog icon button.
Click this to open the edit window for the number / agent in question.
From this edit window, you can edit the phone number, the country the number / agent applies too, the status of the number / agent, and the profile picture.
Once happy with the changes, you can click the green 'save' button found in the bottom right of the popup edit window.
Deleting a Number / Agent
At the end of each number / agent row sits a settings cog icon button.
Click this to open the edit window for the number / agent in question.
A delete button can be found in the bottom left of this popup edit window.
Once clicked, it will prompt you to make sure your happy to delete. If confirmed, the number will be perminantly deleted.
Activate a Number / Agent
To change the status of the number / agent to active, you can click on the red status pill 'Inactive' found next to the profile picture of the number / agent in question.
Clicking this will set the number / agent to Active.
You can simply click this again to deactivate it again.
Alternatively you can also change the status of the number / agent via the edit window, accessible via the settings cog icon at the end of each number / agent row.
Deactivate a Number / Agent
To change the status of the number / agent to inactive, you can click on the green status pill 'Active' found next to the profile picture of the number / agent in question.
Clicking this will set the number / agent to Inactive.
You can simply click this again to reactivate it again.
Alternatively you can also change the status of the number / agent via the edit window, accessible via the settings cog icon at the end of each number / agent row.
Customising the Whatsapp Button
To customise the appearance and placement of the WhatsApp button on your storefront, you can nagivate to 'Online Store' and choose the 'Customise' option for your theme.
One the left of the customiser sits three options, Sections, Theme Settings, and App Embeds. You need to choose the App Embeds option as this app sits on top of your site and not within. See below image.
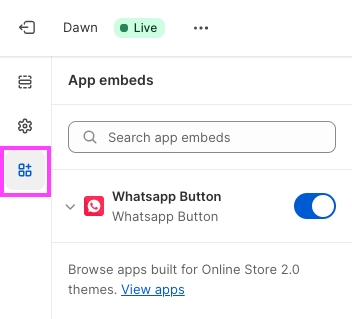
Any app that offer app embed extension would show here, including the WhatsApp Button extension.
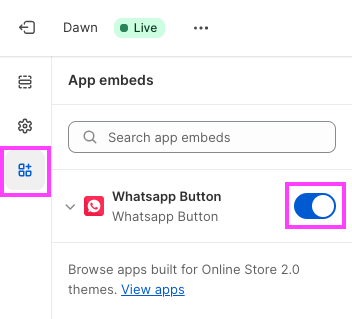
To disable the app from showing on your storefront you can click the toggle button to activate or deactivate the app extension. See below image.
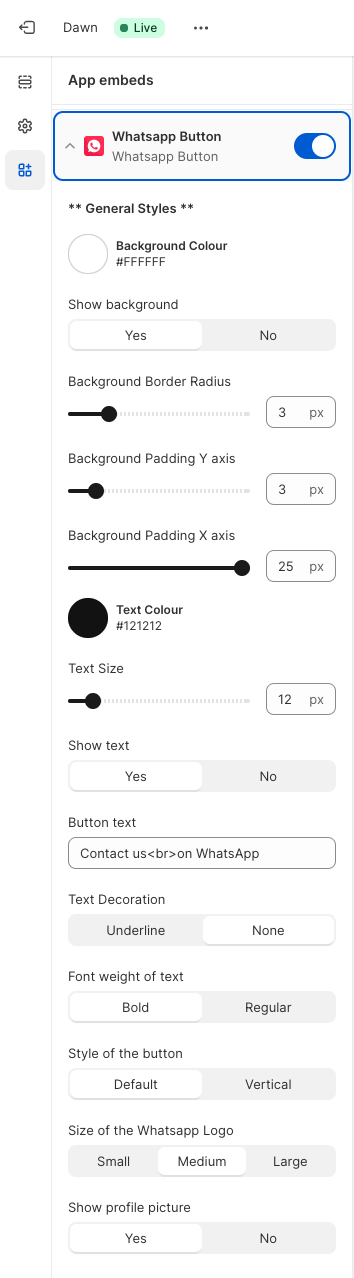
Within the app embed you will see a selection of customisable options. These are listed below. Also see the below images.
- Background colour
- Show background or not
- Background border radius
- Background padding Y & X axis
- Text colour
- Text size
- Show text or not
- Text content
- Text decoration (underlined or not underlined)
- Font weight (bold or regular)
- Style of the button (horizontal - default, or vertical)
- Size of the WhatsApp icon
- Show a profile picture or not
- Size of the profile picture
- Positioning (top-left, top-right, bottom-left, bottom-right)
- Offset controls (how far from the top,left,right,bottom should the button sit)
- Mobile button (if to show just the WhatsApp icon on mobile, or continue to show the desktop version)
- Mobile offset controls (how far from the top,left,right,bottom should the button sit on mobile)
What if i don’t have any active numbers / agents?
If you have no numbers / agents, or no active numbers / agents, then the button will NOT show on your site to prevent the button from appearing not work when the customer clicks it.
How does GEO country targeting work?
When you set a GEO country for a number / agent, then any customers visiting your site from that location will be directed to the set number / agent for that location upon the user clicking the WhatsApp button.
If you only have the one number / agent which is applied to a specific GEO country, then that number will be used for all customers regardless of their location. This is a backup solution to make sure the customer can still communicate with someone from your business.
You can also create a number / agent and leave the GEO country blank, which will then be used for all other countries that don’t have a specific number / agent. For example you may have a number / agent for United Kingdom, and another number / agent with no country set. Customers from the UK would be directed to the United Kingdom number / agent, but customers from anywhere else in the world would be directed to the other number / agent.
How does tracking work?
On the Tracking page, you will see a chat showing engagement and a table with detailed tracking information.
The chart will show click tracking engagement for the past year on a monthly interval.
You can also export this chart via the top right hand 3 bar icon on the chart. Exports can be SVG, PNG, and CSV.
The detail table under the chat shows each and every click. This data is all time and not limited to the current year, and each row has a date and time to help search and refine.
This table will show the Country, Region, City, Device, and Created date.
When a customer clicks the WhatsApp button on your storefront, we capture this click and log it in our system. We capture the following information on the customer. Country, Region, City, Device, and Timezone. This helps us show you where the most clicks are coming from, and how well the app is engaging with your customers. In coming months, we plan to offer more in-depth reports and details for this information.
Set a Number / Agent Profile Picture
At the end of each number / agent row sits a settings cog icon button.
Click this to open the edit window for the number / agent in question.
From this edit window, you can drag and drop a profile picture of your choice onto the upload area.
Alternatively you can choose from one of the 'fake' profile pictures if preferred.
If no profile picture is set, it will ignore any profile picture settings in the customiser.
Edit an Opening Message
On the Settings page, you will see a section dedicated 'Opening Message'.
You can type an opening message which will automatically pre-fill when the customer clicks the WhatsApp button on your site.
Enable & Disable an Opening Message
On the Settings page, you will see a section dedicated 'Opening Message'.
The title section of this area contains a toggle button on the right called 'Enable'.
Once clicked, it will either enable or disable the opening message based on the set option.
If the opening message is enabled but not message content has been set, then it wont auto pre-fill anything when the customer clicks the WhatsApp button on your site.
Upgrading / Downgrading
Within the cog icon in the top right hand corner of the app sits an option called Subscriptions which shows your current plan and all other available plans.
If you are wanting to downgrade, keep in mind your current limits will become active again which may prevent you from uploading any more fonts.
Support
Within the cog icon in the top right hand corner of the app sits an option called Support. Clicking this will take you to the support page where you can fill out the form and wait for our speedy developers and support staff to give you a helping hand.