Enchiridion
Documentation
(Legacy) Install & Usage Product Button Widget
(Shopify 2.0) Install & Usage Product List Widget
(Legacy) Install & Usage Product List Widget
(Shopify 2.0) Install & Usage Manuals List Widget
(Legacy) Install & Usage Manuals List Widget
(Shopify 2.0) Configuring Widgets Enable / Disable Widgets Settings / Domain Name Settings / Store Title Upgrading / Downgrading
Getting Started
Upon installing the app on your Shopify store, you will be presented with an instruction pane to help you sync your products with the Product Manuals application.
Once you have synced your products you will be redirected back to the products page where you will see a table listing all the products from your Shopify Store.
You are now setup and free to upload manuals to products and install and configure widgets.
Products
On the products page, you will see a table listing all the products from your Shopify Store. No need to ever sync products again as we listen for new and updated products add to your store and pull them into the app automatically.
The table of products allows you to search, filter, change results per page, and paginate.
You will also notice some statistics at the top of the page outlining how many products you have, how many manuals you have, how many manuals are active and how many are disabled.
Uploading Manuals
First head over to the products page and view the table of products.
Find the product you wish to upload manuals too, and hit the green 'Manage' button at end of the desired product row.
This will load you into a 'Manuals' page. From here you can drag and drop multiple files onto the uploader pane, and once fully uploaded the table of manuals will update below.
Uploading Limits
Based on your subscription plan you can either upload files with a size of 35mb or 0.2gb in size per file.
The small plan allows 30 files to be stored, and the Pro plan allow unlimited files.
We also have limits on the available file extensions. These are;
'image/jpeg', 'image/jpg', 'image/png', 'image/gif', 'image/psd', 'image/x-photoshop', 'image/photoshop', 'image/svg+xml', 'video/mp4', 'video/mov', 'video/ogg', 'video/3gp', 'application/pdf', 'application/rtf', 'application/photoshop', 'application/psd', 'zz-application/zz-winassoc-psd', 'text/rtf', 'text/pdf'
Deleting Manuals
Navigate over to the products page and view the table of products.
Find the product you wish to delete manuals for, and hit the green 'Manage' button at end of the desired product row.
This will load you into a 'Manuals' page. From here you can hit the red 'Delete' button at the end of each manual file row. A popup confirmation will be presented before any deleting is actioned.
Please note, the deleting of a manual file is irreversible and we wont have a backup copy so be careful.
Resyncing
Navigate over to the products page and view the table of products.
Find the product you wish to enable or disable manuals for, and hit the green 'Manage' button at end of the desired product row.
This will load you into a 'Manuals' page. From here you can click the status button located near the end of each manual file row. Once clicked, the table and status will update. Simply click it again to revert the change.
Please note, only manuals that are active will show in the manuals list widget and product button widget.
Ordering Manuals
Navigate over to the products page and view the table of products.
Find the product you wish to enable or disable manuals for, and hit the green 'Manage' button at end of the desired product row.
This will load you into a 'Manuals' page. From here you can click and drag manuals around the table to change the order in which they display on your webiste.
This allows you to order the manuals in any way your desired for both the product list and manuals list widget.
Installing Widgets
Head over to the widgets page to view the available widgets.
Upon clicking on the 'Install Widget' button a popup will open with a brief description of how to use the widget.
You will also need to choose the theme you wish to install the widget on by selecting your desired theme from the select list within the popup.
Now that you have installed your widget, hit the green 'Configure' button for that widget to open the sidebar configurator. Within the configurator you will find information on how to use install and use the widget with the selected theme.
Shopify 2.0 Themes vs Legacy ThemesWith the release of Shopify 2.0, some themes cater for 'app blocks', which are basically sections for apps within your store customiser allowing you to place the widget where ever you feel like without the need of any code.
For any theme that isn’t yet compatible with Shopify 2.0, we provide a snippet of code which you will need to place into your theme files. See here for information on this.
Within the configurator of the widget, we will tell you what theme the widget is being used with to help to make the necessary installation steps.
Install & Usage GuidesLegacy theme installation & usage guide
Shopify 2.0 ready theme installation & usage guide
Installing Widgets On Another Theme
Head over to the widgets page to view the available widgets.
Click on the green 'Configure' button for the widget in question to open the sidebar configurator.
At the top you will see an area for reinstalling the widget on another theme. Simply choose the desired theme and hit the install button. Within this list of themes, for any theme that is 2.0 compatible you will see a (2.0 Ready) at the end of the theme name which means no code for installation is required.
If the new theme you installed the widget on isnt 2.0 ready, make sure to paste in the snippet code into you theme code outlined in the documenation item below.
Installing & Using Product Button Widget On The Storefront (Legacy)
Head over to the widgets page to view the available widgets.
Click on the green 'Configure' button for the Product Button widget to open the sidebar configurator.
At the top you will see an area containing a snippet of code which is required to be pasted into your theme code. Simply click in this snippet and copy it, we have also pasted it below for you.
Because each theme is different we cannot give exact instructions on where to paste the code snippet, but we can certainly help guide you.
We are using the 'Simple' Shopify free theme in this demonstration.
We suggest searching for and adding the snippet after the {% endform %} tag as this is ofter just after any buttons would be and the ideal place for the form to show.
1. From your Shopify admin, go to Online Store > Themes.
2. Find the theme you want to edit, and then click Actions > Edit code.
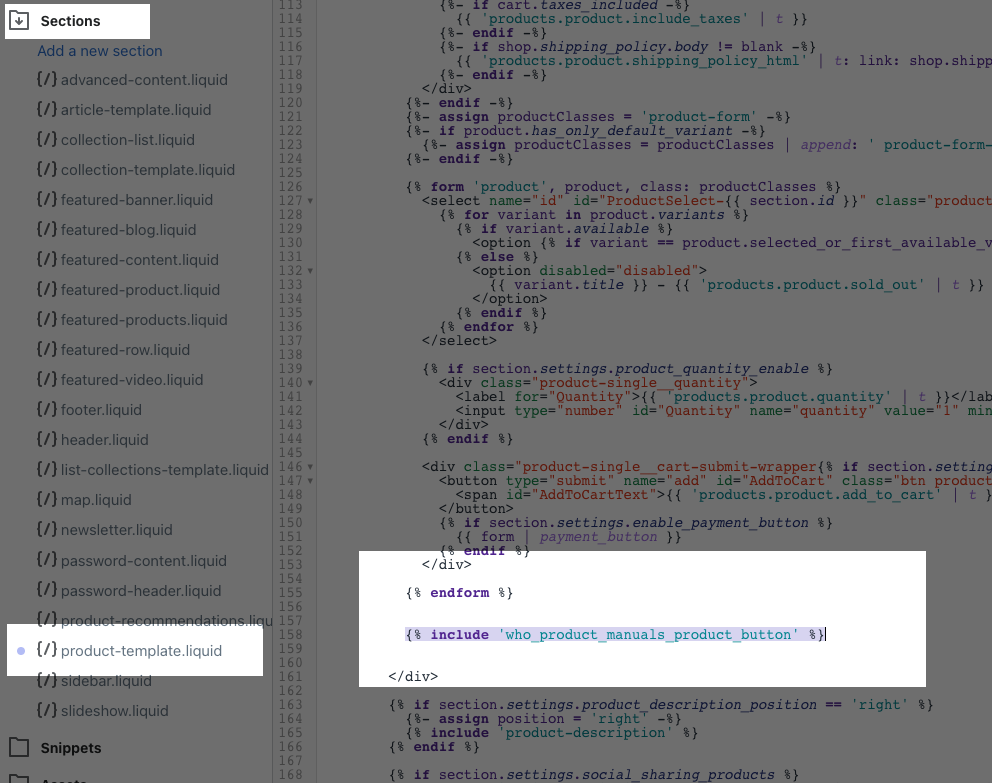
3. In the Sections directory, search for and open product-template.liquid.
4. Find the area in the code where you want your form to appear. Usually, this is below the product buttons. To find your product buttons in the file, search for the {% endform %} Liquid tag.
Below the code that contains the {% endform %} Liquid tag, paste the copied snippet for the widget.
{% include 'who_product_manuals_product_button' %}
You can see in the image below we have added the snippet just below the {% endform %} tag, but before the closing '< /div>' tag.
If you have a multi sectioned theme then this form may be drawn within another snippet. We suggest first searching in the code editor (top left) for product to return all templates and sections relating to the product page.
From here you can then open some of the sections until you find the {% endform %} tag or something relating to the buttons or area you wish to show the manuals button.
For more help with this please raise a Support Ticket for us to help you add this snippet.
Installing & Using Product Button Widget On The Storefront (Shopify 2.0 Ready)
Head over to the widgets page to view the available widgets.
Click on the green 'Configure' button for the Product Button widget to open the sidebar configurator.
At the top you will see an area containing a little piece of information letting you know the theme in use for the widget is 2.0 ready and no installation will need to take place.
You can now head directly into you Online Store > Customiser, and navigate to the page you wish to display the widget. Upon reaching this page in the customiser, simply look in the sections sidebar.
When you click on 'Add Section' or 'Add Block' for an existing section, at the bottom of the popout panel you will see an 'Apps' area. You will now see Product Button listed.
Simply add the section and drag to your desired location on the page.
All customisation for the section is managed within the Enchiridion app via the widget configurator panels. See here for more help on customising the widget.
For more help with this please raise a Support Ticket.
Installing & Using Product List Widget On The Storefront (Legacy)
Head over to the widgets page to view the available widgets.
Click on the green 'Configure' button for the Product List Widget to open the sidebar configurator.
At the top you will see an area containing a snippet of code which is required to be pasted into your theme code. Simply click in this snippet and copy it, we have also pasted it below for you.
Because each theme is different we cannot give exact instructions on where to paste the code snippet, but we can certainly help guide you.
We are using the 'Simple' Shopify free theme in this demonstration.
We suggest searching for and adding the snippet after the {% endform %} tag as this is ofter just after any buttons would be and the ideal place for the form to show.
1. From your Shopify admin, go to Online Store > Themes.
2. Find the theme you want to edit, and then click Actions > Edit code.
3. In the Sections directory, search for and open product-template.liquid.
4. Find the area in the code where you want your form to appear. Usually, this is below the product buttons. To find your product buttons in the file, search for the {% endform %} Liquid tag.
Below the code that contains the {% endform %} Liquid tag, paste the copied snippet for the widget.
{% include 'who_product_manuals_product_list' %}
You can see in the image below we have added the snippet just below the {% endform %} tag, but before the closing '< /div>' tag.
If you have a multi sectioned theme then this form may be drawn within another snippet. We suggest first searching in the code editor (top left) for product to return all templates and sections relating to the product page.
From here you can then open some of the sections until you find the {% endform %} tag or something relating to the buttons or area you wish to show the manuals button.
For more help with this please raise a Support Ticket for us to help you add this snippet.
Installing & Using Product List Widget On The Storefront (Shopify 2.0 Ready)
Head over to the widgets page to view the available widgets.
Click on the green 'Configure' button for the Product List widget to open the sidebar configurator. You will need to be on the Pro plan to use this widget.
At the top you will see an area containing a little piece of information letting you know the theme in use for the widget is 2.0 ready and no installation will need to take place.
You can now head directly into you Online Store > Customiser, and navigate to the page you wish to display the widget. Upon reaching this page in the customiser, simply look in the sections sidebar.
When you click on 'Add Section' or 'Add Block' for an existing section, at the bottom of the popout panel you will see an 'Apps' area. You will now see Product List listed.
Simply add the section and drag to your desired location on the page.
All customisation for the section is managed within the Enchiridion app via the widget configurator panels. See here for more help on customising the widget.
For more help with this please raise a Support Ticket.
Installing & Using Manuals List Widget On The Storefront (Legacy)
Head over to the widgets page to view the available widgets.
Click on the green 'Configure' button for the Manuals Widget widget to open the sidebar configurator.
At the top you will see an area containing a snippet of code which is required to be pasted into your theme code. Simply click in this snippet and copy it, we have also pasted it below for you..
We advise to create a new page template and paste the snippet into that. Then assign your product manuals page to this new template.
1. From your Shopify admin, go to Online Store > Themes.
2. Find the theme you want to edit, and then click Actions > Edit code.
3. In the Templates folder / directory, click the link at the top, Add a new template. (see image 1.1 below)
4. Choose page from the template list, and choose the liquid template type option. (see image 1.1 below)
5. Give you template a name like, manuals-list. (see image 1.1 below)
6. Now past in your snippet for the widget into the new page, often below the {{ page.content }} tag. (see image 1.2 below)
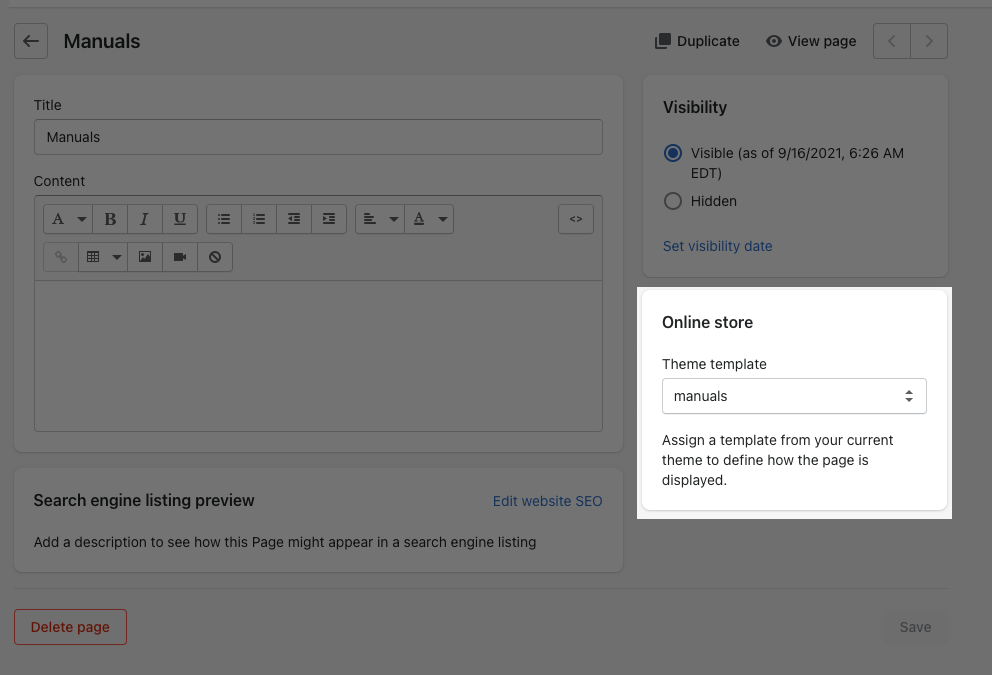
7. Head over to the pages section in your Shopify admin, Online Store > Pages.
8. Choose the page in question and edit it, then choose the new product template in the right hand sidebar. (see image 1.3 below)
You can see in the images below we have created a new template, added our snippet code, and assigned the page template to the page where we wish to show the manuals list.
Image 1.1
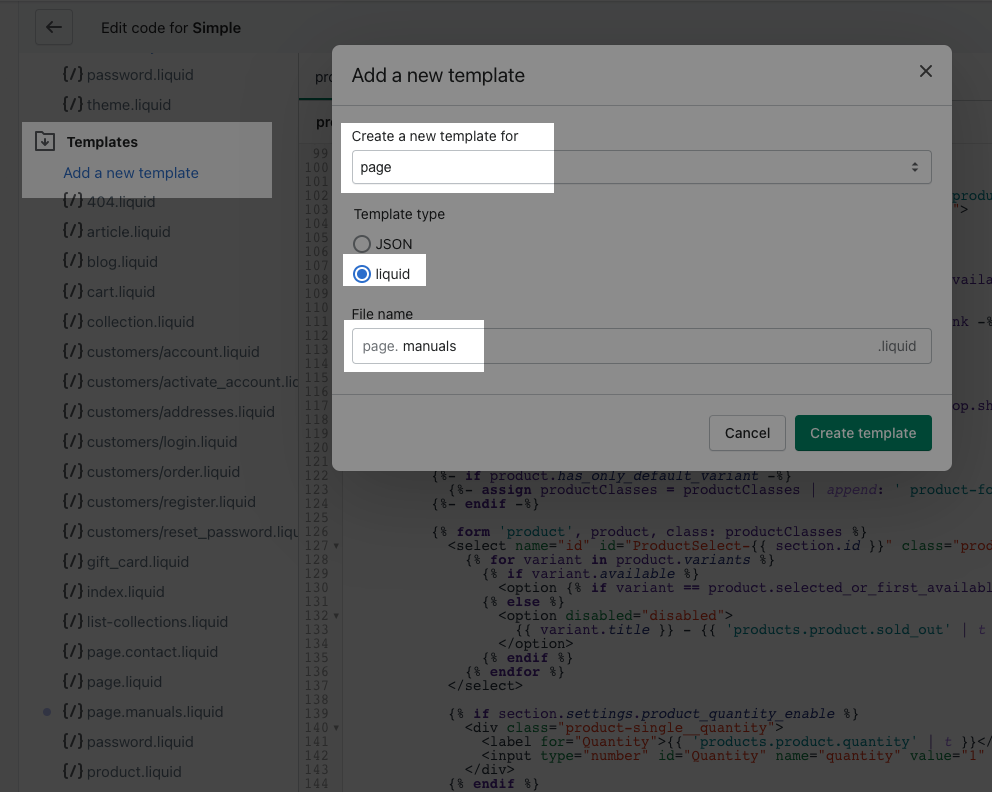
Image 1.2
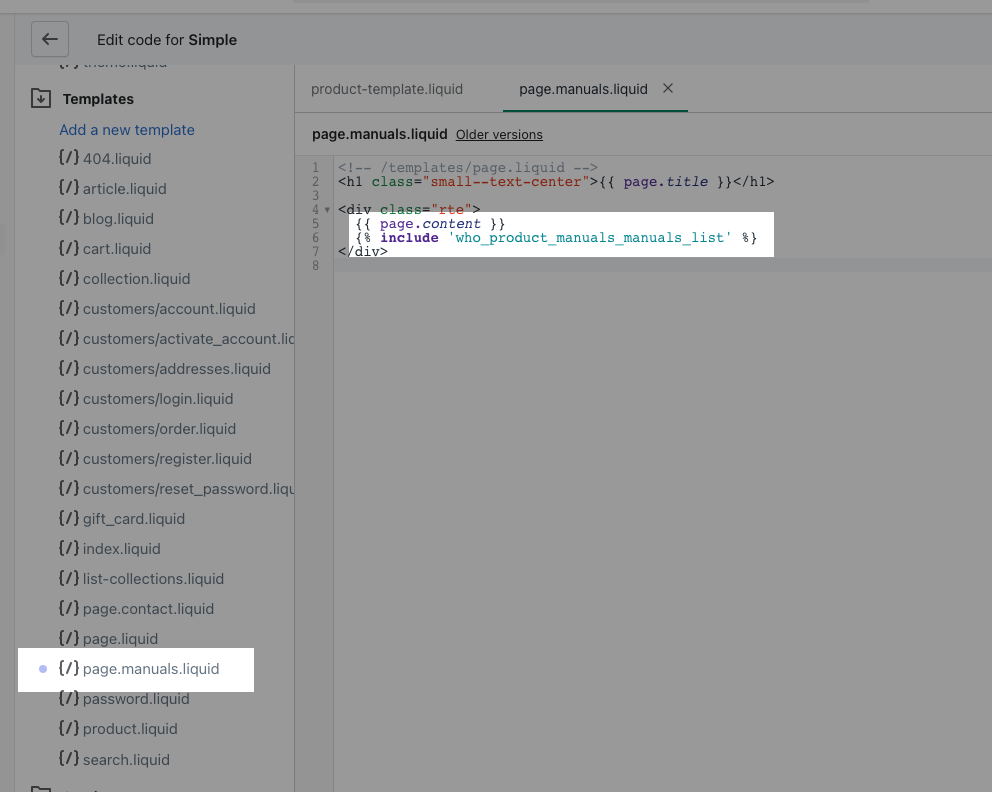
Image 1.3
For more help with this please raise a Support Ticket for us to help you add this snippet.
Installing & Using Manuals List Widget On The Storefront (Shopify 2.0 Ready)
Head over to the widgets page to view the available widgets.
Click on the green 'Configure' button for the Manuals List widget to open the sidebar configurator. You will need to be on the Pro plan to use this widget.
At the top you will see an area containing a little piece of information letting you know the theme in use for the widget is 2.0 ready and no installation will need to take place.
You can now head directly into you Online Store > Customiser, and navigate to the page you wish to display the widget. Upon reaching this page in the customiser, simply look in the sections sidebar.
When you click on 'Add Section' or 'Add Block' for an existing section, at the bottom of the popout panel you will see an 'Apps' area. You will now see Manuals List listed.
Simply add the section and drag to your desired location on the page.
All customisation for the section is managed within the Enchiridion app via the widget configurator panels. See here for more help on customising the widget.
For more help with this please raise a Support Ticket.
Configuring Widgets
Head over to the widgets page to view the available widgets.
Click on the green 'Configure' button for the widget in question to open the sidebar configurator.
Within this editor you can customise the appearance of your widget. Make sure to hit the green save button located at the bottom of the configurator if changes have been made.
If you plan on using the icon setting for buttons please make sure you have Font Awesome integrated with your theme first.
These changes will update instantly on your storefront, and a small preview area is shown in the configurator giving you a quick look before saving the settings.
All widget configuration is managed via the app even if you are 2.0 compatiable. This is due to limitations of app block section elements from Shopify.
Enable / Disable Widgets
Head over to the widgets page to view the available widgets.
Click on the green 'Configure' button for the widget in question to open the sidebar configurator.
At the top you will see an area for turning the status of the widget on or off. Simply toggle this button and scroll to the top of the configurator sidebar and hit save.
This change will update instantly on your storefront.
Alternatively, if you are using the widget on a 2.0 compatible theme you can simply toggle the section on or off via the Shopify store customiser.
Settings / Store Domain
Head over to the settings page to set the store domain name.
This only needs to be set if you have a custom domain on the store, and dont use the default myshopify.com domain publicly.
If you use the myshopify.com domain then leave this setting empty until your site goes live into production using a custom domain, where you will then need to set this settings.
Settings / Store Title
Head over to the settings page to set the store title.
This is used to help customise the appearance of the downloaded files. Some user wish to add a title to the front of the downloaded ZIP file thats made automatically to deliver the manuals to the user.
By default we will name this Zip file,
'variant sku' - 'product title' - 'variant-title'.zip
But some users may want to to display with a store title at the from, for example..
MyStore - 'variant sku' - 'product title' - 'variant-title'.zip
Upgrading / Downgrading
Within the cog icon in the top right hand corner of the app sits an option called Subscriptions which shows your current plan and all other available plans.
If you are wanting to downgrade, keep in mind your current limits will become active again which may prevent you from uploading any more assets.